How to Install Ubuntu 24.04 LTS: The Ultimate Step-by-Step Guide (Dual Boot Supported)
Ubuntu is the most popular open-source operating system in the world. Whether you are a developer, a student, or just someone who wants a fast and secure computer, Ubuntu is the perfect choice.
In this detailed guide, we will walk you through the entire process of installing Ubuntu 24.04 LTS (Noble Numbat) on your PC or Laptop. We will also cover how to keep your Windows data safe if you want to use both (Dual Boot).
Phase 1: Preparation (Don't Skip This!)
Before we start, you need a few things:
- A USB Pen Drive: Minimum 8GB or 16GB. (Note: All data on this USB will be deleted).
- The ISO File: Download the latest Ubuntu Desktop LTS image from the official website.
- Rufus (for Windows): A small software to make your USB bootable. Download it here.
Backup: If you are installing this on your main computer, please backup your important files to an external hard drive or Google Drive. Better safe than sorry!
Phase 2: Creating the Bootable USB
First, we need to turn your normal USB drive into an Ubuntu installer.
- Plug in your USB drive.
- Open Rufus.
- Device: Select your USB drive.
- Boot selection: Click "SELECT" and choose the Ubuntu ISO file you downloaded.
- Partition scheme:
- Select GPT (if your computer is new/UEFI).
- Select MBR (if your computer is very old/Legacy BIOS).
- Click START. Rufus will warn you that all data on the USB will be destroyed. Click OK.
Wait for the process to finish (it takes about 5-10 minutes).
Phase 3: BIOS Settings and Booting
This is the tricky part where most people get stuck. We need to tell your computer to start from the USB, not the Hard Disk.
- Shut down your computer completely.
- Turn it on and immediately start pressing the Boot Menu Key.
- HP: F9 or Esc
- Dell: F12
- Lenovo: F12 or Fn+F12
- Asus: F8 or Esc
- Acer: F12
- In the Boot Menu, you will see your USB drive (e.g., "UEFI: SanDisk"). Select it and press Enter.
Tip: If you don't see the USB, you might need to go into BIOS settings (F2 or Del) and disable "Secure Boot."
Phase 4: The Installation Process
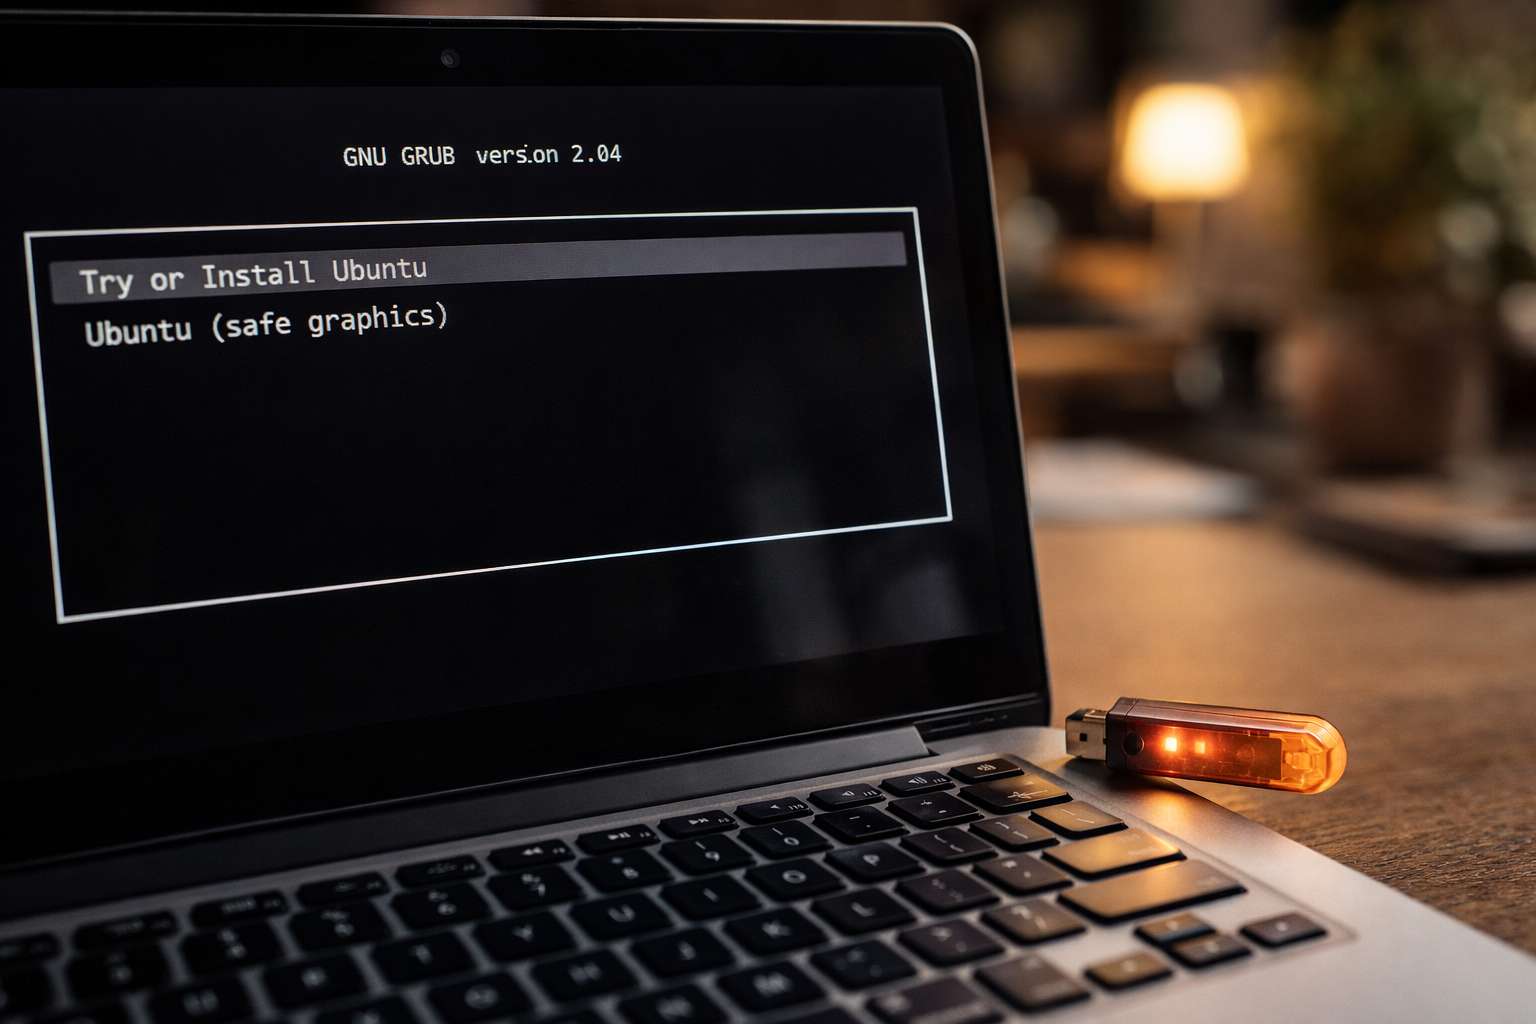
Once the black screen with the Ubuntu logo appears, follow these steps:
Step 1: Try or Install
You will see a welcome screen.
- Try Ubuntu: This lets you use the OS without installing it. Great for testing wifi/sound.
- Install Ubuntu: Click this to start the actual installation.
Step 2: Keyboard Layout
Choose your keyboard style.
- Standard: English (US)
- Click Continue.
Step 3: Updates and Other Software
- Normal Installation: Installs web browser, utilities, office software, games, and media players. (Recommended).
- Minimal Installation: Installs only the web browser and basic utilities.
- Check the box: "Install third-party software for graphics and Wi-Fi hardware." (Crucial for playing videos and using Wi-Fi).
- Click Continue.
Step 4: Installation Type (Critical Step!)
Here you have two main choices:
Option A: Erase disk and install Ubuntu (Clean Install)
- Warning: This deletes Windows and ALL your files.
Use this if you want only Ubuntu on your laptop.
Option B: Install Ubuntu alongside Windows Boot Manager (Dual Boot)
- Use this if you want to keep Windows and choose between Windows/Ubuntu every time you turn on the PC.
The installer will ask you to drag a slider to choose how much space to give Ubuntu (e.g., 50GB).
Option C: Something Else (Manual Partitioning)
Only for experts. You manually create partitions like
/(Root),/home, andswap.
Select your option and click Install Now. A popup will ask to confirm writing changes to the disk. Click Continue.
Step 5: Who Are You?
- Where are you? Select your time zone (e.g., Kolkata) on the map. Click Continue.
- Your Details:
- Your name: Enter your full name.
- Computer's name: Give your PC a cool name.
- Username: Pick a short username (lowercase).
- Password: Create a strong password. Do not forget this! You will need it to install apps later.
Phase 5: The Final Wait
Now, the installer will copy files and setup the system.
- This takes about 10 to 20 minutes depending on your internet speed and hard drive (SSD is faster).
You will see a slideshow of Ubuntu features.
The Finish Line: Once done, a message will pop up: "Installation Complete."
- Click Restart Now.
- The screen will say: "Please remove the installation medium, then press Enter."
- Pull out your USB drive.
Press Enter.
Conclusion
Congratulations! Your computer will now reboot into your brand new Ubuntu desktop.
What to do next?
- Connect to Wi-Fi.
- Open the "Software Updater" and install the latest patches.
Open the terminal (
Ctrl+Alt+T) and run your first command:
sudo apt update && sudo apt upgrade
Welcome to the world of Linux!
You Might Also Like
 Tech Solutions
The Ultimate Guide to Upwork (2026): How to Create an Account, Optimize Your Profile, and Win High-Paying Clients
Welcome to the World's Work MarketplaceThe traditional 9-to-5 job is no longer the only way to build a successful tech career. Upwork has evolved into the largest and most lucrative freelance marketplace on the internet. Whether you are looking for a side hustle or aiming to build a full-time remote agency, Upwork is where the highest-paying clients go to find top talent.However, Upwork is highly competitive. Simply creating an account is not enough; you need a strategic approach to stand out, bypass the algorithm, and convince clients to trust you with their projects.In this comprehensive guide, we will walk you through the exact, step-by-step process of setting up a winning Upwork account, understanding its hidden mechanics, and landing your first tech contract. Phase 1: The Step-by-Step Account CreationCreating an account takes about 10 minutes, but doing it correctly prevents you from getting rejected (Upwork sometimes rejects new profiles if they feel the platform has too many freelancers in a specific niche). Step 1: Sign UpGo to Upwork.com and click the "Sign Up" button in the top right corner.You will be asked: "Are you a client hiring for a project or a freelancer looking for work?" Select "I am a freelancer, looking for work" and click "Apply as a Freelancer."Fill in your basic details (Name, Email, Password, Country) or continue with your Google/Apple account.Important: Use your real legal name. Upwork will require identity verification (Government ID) later before you can withdraw money.Step 2: Verify Your EmailCheck your inbox and click the verification link sent by Upwork to activate your account.Step 3: The Initial Setup WizardUpwork will ask a few questions to gauge your experience level:Have you freelanced before? (Select your honest experience level).What is your biggest goal for freelancing? (e.g., "To earn my main income").How would you like to work? (Select "I'd like to find opportunities myself").Step 4: Import or Build Your ResumeYou will be given the option to import your LinkedIn profile, upload a PDF resume, or fill it out manually. Always choose to fill it out manually. Automated imports often mess up the formatting and leave out crucial keywords. Phase 2: Building a 100% Complete Profile (The Secret Sauce)Your profile is your digital storefront. If a client lands on it, they should instantly know what problem you solve. Let's look at how to optimize this, using a tech/developer persona as an example. 1. The Professional Title (Your Headline)Do not write generic titles like "Web Developer" or "Programmer." The Upwork search algorithm favors highly specific, niche titles.❌ Bad: Backend Developer✅ Good: Full-Stack Django Developer & DevOps Engineer | AWS | Docker 2. The Profile Overview (Your Pitch)Clients do not want to read your autobiography. They want to know how you can help them. Structure your overview into three parts: The Hook, The Skills, and The Call to Action.Example Overview Template:"Are you looking to build a scalable, secure, and fast web application? Or perhaps you need to deploy your existing Django project seamlessly to the cloud?I am a specialized Full-Stack Django Developer and DevOps Engineer. I help businesses build robust backend architectures and automate their deployments so they can focus on growth, not server crashes.My Core Expertise:Backend: Python, Django, Django Rest Framework (DRF)Database: PostgreSQL, Data Restoration & MigrationsDevOps & Cloud: Docker containerization, DigitalOcean, AWS, CI/CD pipelines (GitHub Actions)Web Dev: Domain configuration, SEO, and HostingWhether you need a complex real-time web application, RESTful APIs, or a secure server deployment, I deliver clean code and reliable infrastructure. Let's discuss your project requirements today!" 3. Adding Portfolio ItemsClients hire based on proof. Add at least 3-4 portfolio items.If you built a blog, don't just say "I built a blog." Frame it technically: "Developed a real-time Django-based content platform deployed on DigitalOcean using Docker."Include high-quality screenshots, system architecture diagrams, and links to live projects or GitHub repositories. 4. Setting Your Hourly RateDon't price yourself too low; clients associate low rates with low quality. For a skilled Backend/DevOps engineer, starting between $25 to $40/hour is reasonable to get your first few jobs. Once you have a few 5-star reviews, you can scale this up to $60-$100+/hour. 5. Profile Picture & VideoUpload a clear, smiling, professional headshot with a clean background. A 60-second introduction video dramatically increases your chances of getting hired, as it builds instant trust. Phase 3: Understanding the Upwork EcosystemTo succeed, you must understand the rules of the game. 1. What are "Connects"?Connects are Upwork's virtual currency. You need Connects to apply for jobs (submit proposals).Most jobs require between 4 to 16 Connects to apply.Connects cost $0.15 each.Upwork gives you 10 free Connects every month, but serious freelancers buy Connects as a business investment. Do not spam proposals; treat every Connect like real money. 2. The Fee Structure (Updated)Upwork charges a flat 10% freelancer service fee on all earnings. Whether you earn $100 or $10,000 from a client, Upwork takes 10%. (This is a major update from their old tiered 20/10/5% system). 3. Job Success Score (JSS) & BadgesAfter you complete a few jobs, you will receive a JSS percentage. Your goal is to keep this above 90%.Rising Talent: Given to new profiles with great setups and immediate early success.Top Rated: Achieved by maintaining a 90%+ JSS and earning at least $1,000 in 12 months. This badge acts as a magnet for high-paying clients. Phase 4: How to Win Your First Job (The Proposal Strategy)Your first job is the hardest to get. Clients are hesitant to hire someone with zero reviews. To overcome this, your proposal (Cover Letter) must be flawless.The Golden Rules of Proposals:Never use copy-paste templates. Clients can spot them instantly.Focus on the first two lines. When a client looks at proposals, they only see the first two sentences before clicking "Read More." Put your strongest hook here.Address their specific problem. A Winning Proposal Structure:Greeting: "Hi [Client Name]!" (Find their name in the reviews left by other freelancers).The Hook: "I see you are struggling with setting up GitHub Actions for your Django project and need an AI-based PR reviewer implemented."The Solution: "I recently completed a similar DevOps setup where I secured CI/CD workflows and integrated automated PR reviews. For your project, I would start by containerizing the app with Docker to ensure consistency, then write the YAML scripts for the GitHub Actions."The Proof: "I am an experienced Full-Stack Django & DevOps engineer. You can see my recent deployments in my portfolio."Call to Action: "Are you available for a quick 5-minute chat to discuss the server environment you are currently using?" Phase 5: Staying Safe and Getting Paid 1. Avoiding Scams (Red Flags)As a new freelancer, scammers will target you. Watch out for:Clients asking to communicate on Telegram or WhatsApp before a contract is started (This violates Upwork's Terms of Service and will get you banned).Clients asking you to pay a "security deposit" or buy equipment.Clients asking for free "test work" that takes hours. 2. Payment ProtectionHourly Contracts: Track your time using the Upwork Desktop App. It takes screenshots of your screen. If you use this, Upwork guarantees your payment even if the client's credit card fails.Fixed-Price Contracts: Ensure the client deposits the money into Upwork's Escrow before you start typing a single line of code. Never work without funded milestones. 3. Withdrawing Your MoneyUpwork offers several ways to get your hard-earned cash:Direct to Local Bank (Wire Transfer or Local Currency): Best for most countries.Payoneer: Excellent for digital nomads.PayPal: Fast and widely accepted. Conclusion: The Snowball EffectStarting on Upwork requires patience. You might send 20 proposals before landing your first $50 job. But once you get that first 5-star review, the Upwork algorithm starts favoring you.The second job comes easier. The third job pays double. Within a few months, clients will start sending you invitations to interview. Keep your technical skills sharp, treat your clients professionally, and the Upwork ecosystem will reward you.
 Tech Solutions
How to Set Up a Password in AnyDesk for Unattended Access (Step-by-Step Guide)
Have you ever needed to access your office computer from home, or your home PC while traveling, but there was no one on the other end to click "Accept"?By default, AnyDesk requires a user on the remote computer to manually accept the connection request. However, AnyDesk offers a feature called "Unattended Access." This allows you to set a permanent password. Once set, you can connect to your computer anytime, from anywhere, just by entering that password—no human interaction required.In this guide, we will walk you through the exact steps to set up a password in AnyDesk on Windows. PrerequisitesAnyDesk Installed: Ensure you have the latest version of AnyDesk installed on the computer you want to control (the Host).Admin Rights: You will need administrator permissions on Windows to change security settings. Step-by-Step GuideStep 1: Open AnyDesk and Access SettingsLaunch the AnyDesk application on the computer you want to access remotely. Look for the Hamburger Menu (four horizontal lines) located in the top-right corner of the window. Click it and select Settings. Step 2: Navigate to Security SettingsIn the Settings menu, you will see a list of options on the left sidebar. Click on Security.This is the most critical section. By default, sensitive settings are locked to prevent unauthorized changes. Step 3: Unlock Security SettingsYou will see a red bar or a button at the top of the Security page that says "Unlock Security Settings". Click this button. Windows will ask for permission (User Account Control). Click Yes. Note: If you don't do this, all the password options will be greyed out. Step 4: Enable Unattended AccessScroll down to the section labeled Permissions or Unattended Access. You will see a checkbox that says "Enable unattended access" (or "Enable permanent password"). Check this box. Step 5: Set Your PasswordAs soon as you check the box, a prompt will appear asking you to set a password.Password: Enter a strong password (mix of letters, numbers, and symbols).Confirm Password: Type it again.Permission Profile: You can usually leave this as "Full Access" or "Default" unless you want to restrict what you can do remotely.Click Apply.Step 6: (Optional) Two-Factor AuthenticationFor extra security, AnyDesk now allows Two-Factor Authentication (2FA). Inside the same Security menu, you can scan a QR code using an app like Google Authenticator. This means even if someone steals your password, they cannot access your PC without your phone. How to Connect Using the PasswordNow that you have set it up, here is how to use it:Go to your other computer (Client).Enter the AnyDesk ID (the 9-digit number) of the remote computer.Click Connect.Instead of waiting for someone to accept, a window will pop up asking for authorization.Enter the Password you just created.(Pro Tip): Check the box "Log in automatically from now on" if you trust this device, so you don't have to type the password every time. Troubleshooting Common IssuesQ: The password option is greyed out? A: You forgot to click "Unlock Security Settings" (Step 3) or you are not running AnyDesk as an Administrator.Q: It says "Interactive Access" is blocked? A: In the Security settings, make sure "Interactive Access" is set to "Always Show Incoming Session Requests" or "Allow".Q: I forgot the password. How do I reset it? A: You must have physical access to the remote computer. Go back to Settings > Security, uncheck "Enable unattended access," and then check it again to set a new password. Security Warning ⚠️Never share your AnyDesk password or ID with strangers. Scammers often ask users to install AnyDesk to steal money. Only set this password for your own personal devices or trusted family members.
 Tech Solutions
How to Restore Missing Data for Specific Django Models Using pgAdmin 4 (Step-by-Step Guide)
Have you ever found yourself in a situation where your Django application is running fine, but you realize that data is missing from just 2 or 3 models?Perhaps you did a partial backup, or a migration failed halfway. You have 10 tables in your current database, but 3 of them are empty. You have the data in an old database backup, but you don't want to overwrite the entire current database just to get those 3 tables back.The solution? Targeted Table Migration using pgAdmin 4.In this guide, we will walk through the exact steps to export data from specific tables in your old database and import it into your current database without touching the rest of your working data. PrerequisitespgAdmin 4 installed and connected to both your "Old" and "Current" databases.The structure (schema) of the models in both databases must be exactly the same.Basic knowledge of your Django App names and Model names (e.g., if your app is blog and model is Post, the table name is blog_post). Step 1: Export Data from the Old DatabaseInstead of doing a full database backup, pgAdmin 4 allows us to export data from single tables easily using CSV files.Open pgAdmin 4 and navigate to your Old Database.Go to Schemas > public > Tables.Right-click on the specific table you want to export (e.g., appname_modelname).Select Import/Export Data... from the dropdown menu.In the dialog box:Import/Export: Slide the button to Export.Filename: Click the folder icon and choose a location to save the file (e.g., missing_model_data.csv).Format: Select csv.Header: Set to Yes (Important: this includes column names).Delimiter: Select , (comma).Click OK. You will see a "Process Started" and then "Process Completed" notification in the bottom right corner.Repeat this step for the other 2 or 3 missing tables. Step 2: Prepare the Current Database (Disable Constraints)Relational databases have Foreign Keys. If the table you are importing data into depends on another table, PostgreSQL might block the import. To prevent this, it is best to temporarily disable constraints or ensure you import the "Parent" tables before the "Child" tables.Also, if your current table has some partial/broken data, you should clear it.Open a Query Tool in your Current Database (Right-click database name > Query Tool).To clear the existing empty/broken table, run: TRUNCATE TABLE appname_modelname CASCADE;(Warning: This deletes all data in that specific table). Step 3: Import Data into the Current DatabaseNow, let's bring that CSV data into your live database.In pgAdmin, navigate to your Current Database > Schemas > public > Tables.Right-click on the table where the data is missing.Select Import/Export Data....In the dialog box:Import/Export: Slide the button to Import.Filename: Select the CSV file you created in Step 1.Format: csv.Header: Set to Yes.Delimiter: , (comma).Go to the Columns tab in the same dialog box. Ensure all columns are checked.Click OK.Your data is now in the current database! But wait, do not skip the next step. Step 4: The Critical Django Fix (Reset Primary Key Sequences)This is where 90% of Django developers get stuck.When you import data with existing ID numbers (Primary Keys) via pgAdmin, PostgreSQL does not automatically update its internal "counter" (the sequence). If you try to create a new object in Django Admin now, you will get a "duplicate key value violates unique constraint" error.You must tell Postgres what the new highest ID is.Open the Query Tool on your Current Database.Run this SQL command for each table you just imported: SELECT setval(pg_get_serial_sequence('appname_modelname', 'id'), coalesce(max(id), 1), max(id) IS NOT null) FROM appname_modelname; SummaryBy using the Import/Export feature in pgAdmin 4, you can surgically move data between databases without affecting your working tables. Just remember to always reset your Primary Key sequences at the end, and your Django ORM will work perfectly.Happy coding!
 Tech Solutions
How to Create a Python Virtual Environment on Ubuntu and Windows
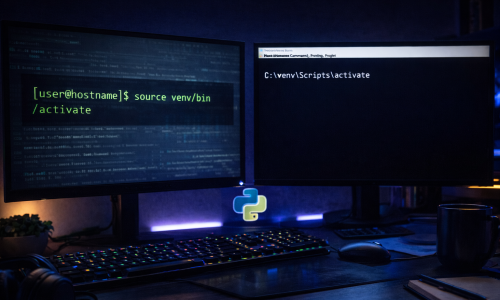
If you are a Python developer, using a Virtual Environment is one of the most important habits to learn. It allows you to create an isolated space for your project, ensuring that the libraries you install for one project do not conflict with another.In this guide, we will show you how to set up a virtual environment on both Ubuntu (Linux) and Windows in the easiest way possibleWhat is a Virtual Environment? A virtual environment is a self-contained directory tree that contains a Python installation for a particular version of Python, plus a number of additional packages. It prevents "dependency hell" where different projects need different versions of the same library.Option 1: Setup on Ubuntu (Linux) Step 1: Install the venv package On Ubuntu, the virtual environment module often needs to be installed separately. Open your terminal and run: sudo apt update sudo apt install python3-venvStep 2: Create the Environment Navigate to your project folder and create the environment. We will name it "venv" (a common standard). python3 -m venv venv Step 3: Activate the Environment To start using it, you must activate it. source venv/bin/activate You will know it is working because your terminal prompt will change to show (venv) at the beginningOption 2: Setup on Windows Step 1: Open Command Prompt or PowerShell Navigate to your project folder using cd. Step 2: Create the Environment Windows usually comes with the venv module included in Python. python -m venv venv Step 3: Activate the Environment The command to activate looks slightly different on Windows: venv\Scripts\activate venv\Scripts\Activate.ps1 Note: If you get a permission error in PowerShell, run Set-ExecutionPolicy Unrestricted -Scope Process to allow the script to run.How to DeactivateWhen you are done working, you can exit the virtual environment by simply typing: deactivate Your terminal will return to normal, and you are free to switch to other projects!